
The Epson Connect API enables application developers to quickly add print and scan capability to their application using Epson’s cloud service “Epson Connect”. This cloud service supports our personal/home printers and business inkjet printers.
Note:
Epson Connect does NOT currently support receipt printers, label printers or commercial/digital printers
For more information, please also visit the FAQ at https://www.epsondevelopers.com/faq/
Let’s get started with learning about development using the Epson Connect API.
The Epson Connect API provides ways of controlling and executing printing to the Epson device (such as printer) connected to Epson’s cloud service “Epson Connect”. The API offers the capability for easy and seamless remote printing.
For additional details, please visit the Epson Open Innovation website.
 |
 |
 |
| Print remotely from anywhere | User privacy is protected by deleting the files uploaded to Epson Connect immediately after printing | Easy linking with many cloud services |
Epson offers the following applications using the Epson Connect API.
Linking with API for such as Slack allows users to print the files shared in a Slack channel. One way to do it is create a BOT that prints the most recently shared PDF or photo by typing a command “/print”
 |
The Epson Connect API offers print capability without having to worry about user’s data retention. For example, the web application that sells arts online can be connected to the specific printers, which allows the art providers to sell only the hard copies. This way prevents users from saving electric data on their devices.
 |
The integration of printers with a web application that generates images provides a comprehensive solution. For example, attendees can print their badges simultaneously at an event check-in.
 |
Please see the below links for additional Use Case examples.
The printing flow is summarized in the following steps.
1. Authentication
2. Create print job
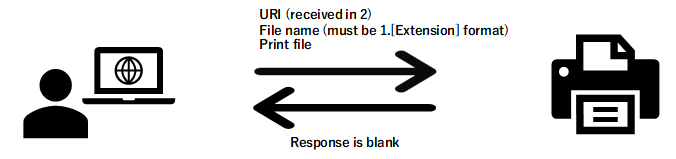
3. Upload print file
4. Execute print
This is the first step that authorizes you are an official user. Specify the correct ID (Client ID) and password (Client secret). Also specify which device you want to use by email address. If you are confirmed as the correct user, you will receive a string as Key string (Access token) and a device identification number (Device ID).
 |
This is the step that requests a device to prepare printing. Specify your access token and device identification number (Device ID) received in Step 1 and get your device ready to print. If your access token and Device ID are verified, you will receive a serial number for printing (print job ID) and URI to upload print data.
 |
The is the step to upload print file. Upload file(s) to URI you received in Step 2. Please check the specification details for additional requirements such as having a file name with a number “1”.pdf, etc.
No response is returned even if upload is successful.
 |
The last step is print execution. Execute print by specifying your access token and Device ID received in Step 1 and print job ID received in Step 2.
 |
The scanning flow is summarized in the following steps.
1. Authentcation
2. Register scan destination
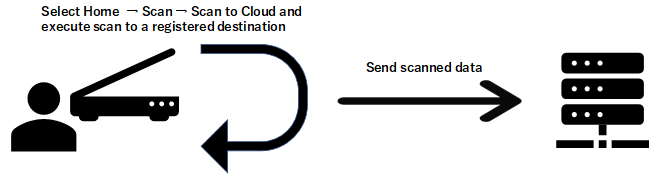
3. Execute scan
This is the first step that authorizes you are an official user. Specify the correct ID (Client ID) and password (Client secret). Also specify by email address which device you want to use.
If you are confirmed as the correct user, you will receive a string as Key string (Access token) and a device identification number (Device ID).
 |
This is the step that registers a scan destination. Specify your access token and device identification number (Device ID) received in Step 1 and register a scan destination to the target device. If your access token and Device ID are verified, the information will be registered as a scan destination.
 |
The last step is execute scan. Select Home → Scan → Scan to cloud on the target device.
Verify a scan destination registered in Step 2 is displayed in the scan destination list.
Execute scan by selecting a scan destination registered in Step 2.
 |
| 1. Sign Up | Sign up for a developer account on the Epson Connect API site. | |
| 2. Learn |  |
Download the documents (API specification or Sample codes) that you will need for development from the Epson Connect API site. |
| 3. Obtain License | Submit your request to obtain your license to use the API on the Epson Connect API site. | |
| 4. Develop |  |
Start builiding your application. Have you registered your Epson printer to Epson Connect yet? Click here for more information how to register in Epson Connect. |